

Drawing a realistic capybara may sound challenging, but with the right method, anyone can do it—even if you’re just starting out. Capybaras are the world’s largest rodents, famous for their calm nature and unique body shape. Their thick fur, rounded snout, and gentle eyes are not as simple as they look.
Getting these details correct makes all the difference between a cartoon capybara and one that feels alive on paper.
To help you create a lifelike drawing, this guide breaks the process into clear steps. You’ll learn how to observe, sketch, shade, and refine, all using simple tools. Plus, you’ll discover small tips that many beginners miss, like how to capture the subtle fur texture and the way light falls on their body.
By the end, you’ll not only have a finished drawing but also skills you can use for any animal portrait.
Gather Your Drawing Materials
Before starting, having the right tools makes the process smoother. You don’t need expensive art supplies. A few simple items are enough:
- Pencils: Use HB for sketching, 2B or 4B for shading.
- Eraser: Kneaded erasers are best for soft corrections.
- Paper: Any smooth, thick paper is fine (A4 or similar).
- Blending tool: You can use a blending stump or even tissue.
- Reference photo: Choose a high-quality capybara photo.
If you want deeper shadows or fine lines, add a mechanical pencil and a soft brush for blending. Professional artists often use these to add realism.
Study The Capybara’s Features
Observation is the foundation of realistic art. Spend a few minutes just looking at your reference image. Notice:
- Body shape: Capybaras have large, barrel-like bodies.
- Head: Broad with a blunt nose and small, round ears.
- Eyes: Placed high on the head.
- Legs: Short and sturdy.
- Fur texture: Coarse and thick, not smooth.
Many beginners overlook the proportions. The head is much smaller compared to the body than you might think. Study this carefully before sketching.
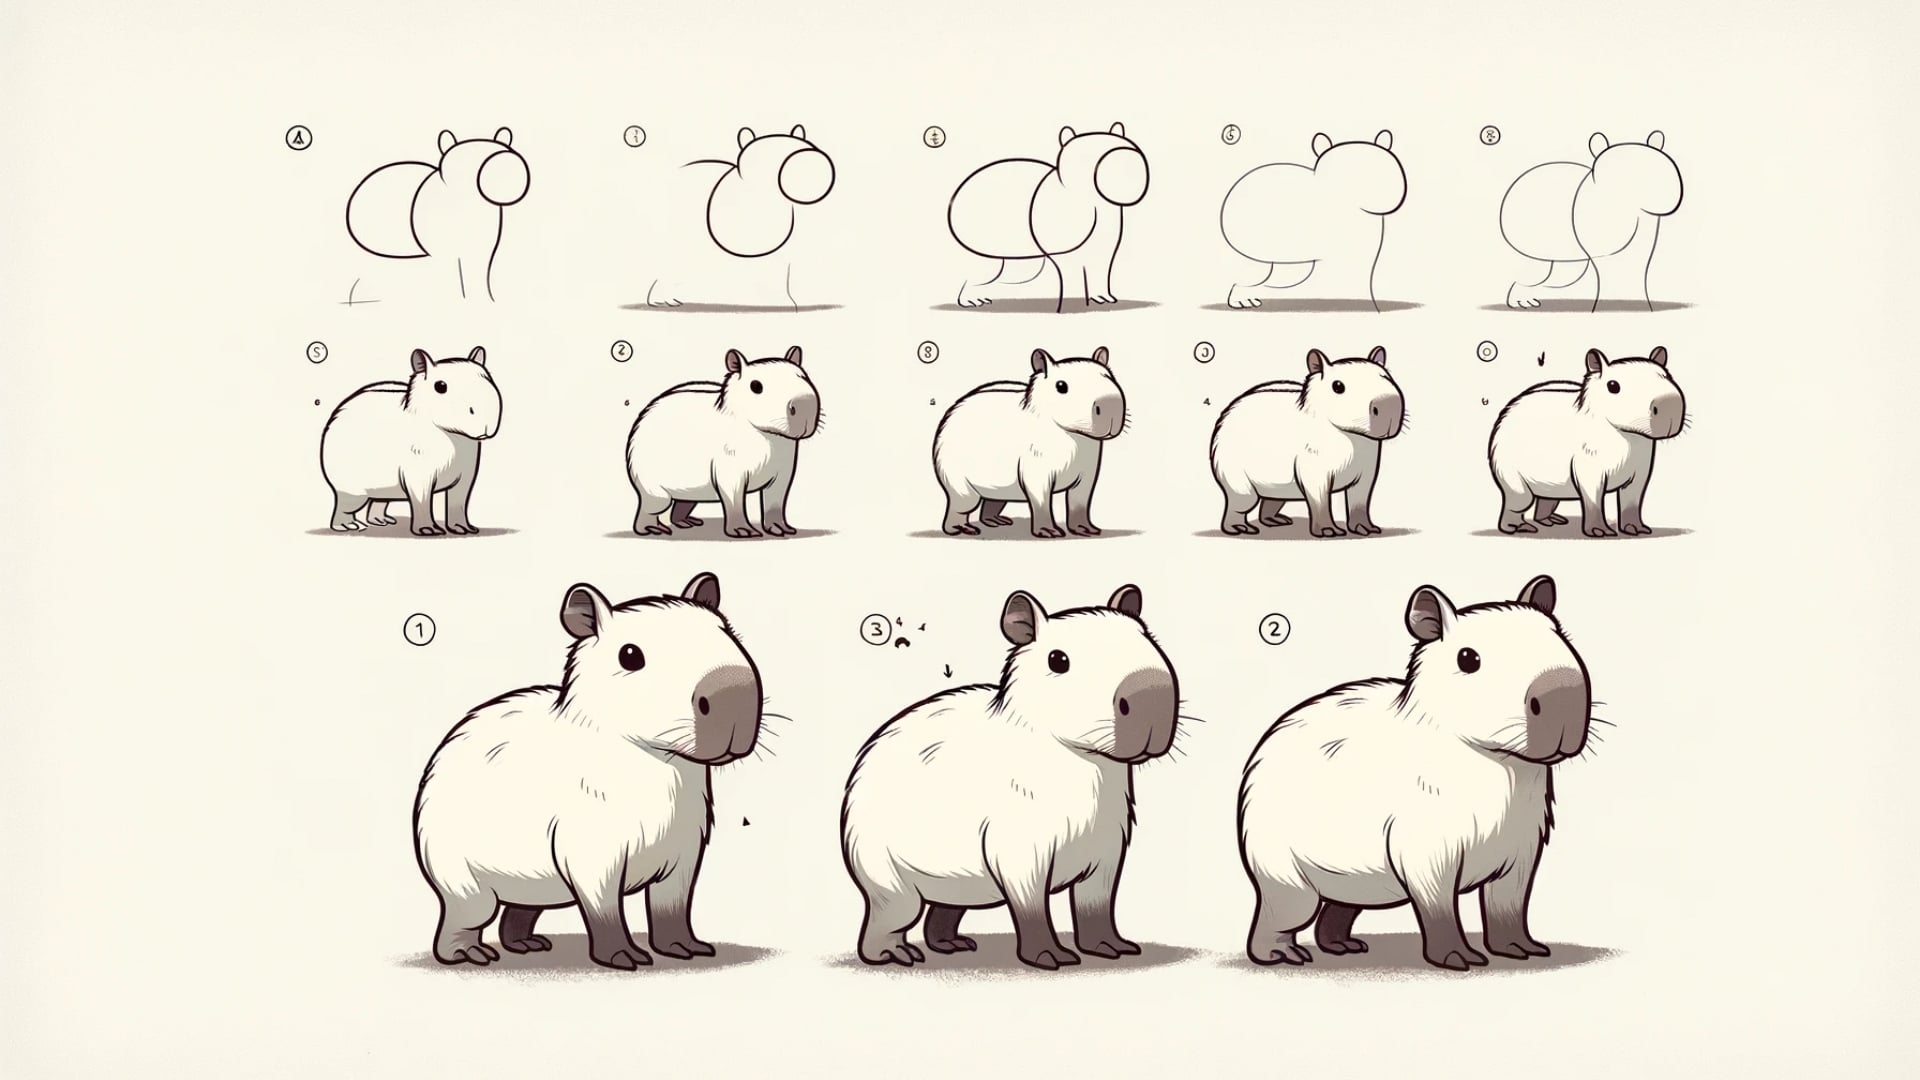
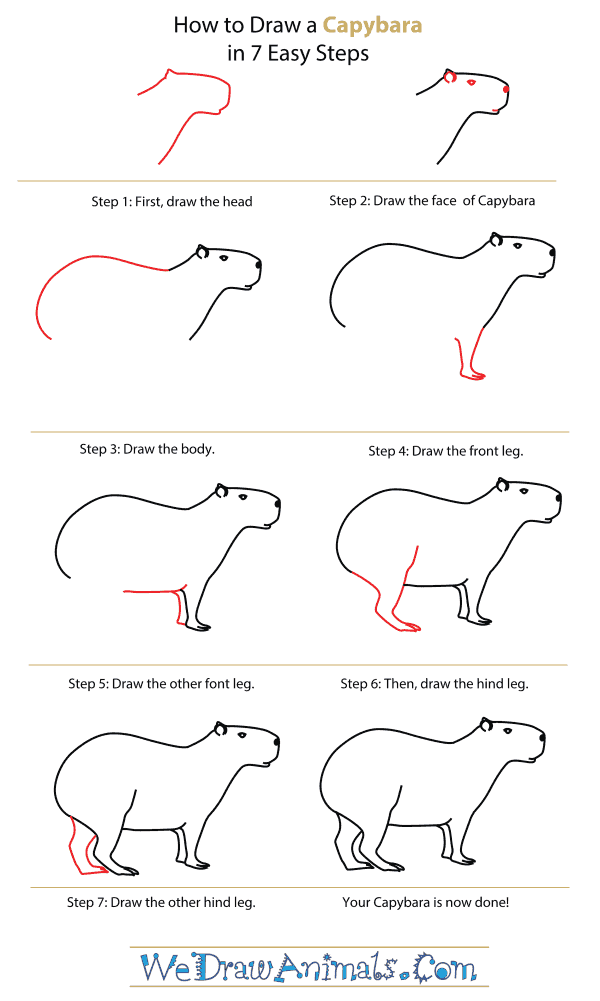
Build The Basic Structure
Start with a light sketch. Don’t press hard—you’ll erase and adjust as you go.
- Draw two overlapping ovals: One large for the body, one smaller for the head.
- Add a guideline for the spine: This helps you curve the body naturally.
- Sketch the legs: Use straight lines to place them correctly. Remember, the front legs are visible, back legs may be partly hidden.
- Mark the position of eyes, ears, and nose: Use dots or small circles.
Compare your sketch with your reference. If something looks off, adjust now. Getting the structure right early saves frustration later.
Develop The Outline
Once you’re happy with your structure, refine the outline.
- Use firmer lines for the final shape.
- Add curves for the belly and back.
- Draw the ears with a slightly pointed tip.
- Outline the snout, showing its rounded end.
- Refine the feet, adding toes if they’re visible.
Don’t rush this stage. A careful outline gives your drawing a clean look.
Place Key Details
Now, add the important features that make a capybara look real.
- Eyes: Draw almond-shaped eyes, leaving a small white spot for light reflection.
- Nose: Capybara noses are wide and flat. Add small nostrils.
- Mouth: A subtle, curved line under the nose.
- Ears: Place them high and slightly back, with fur lines.
- Feet: Add small claws and webbing if visible.
Notice how the details line up with your guidelines. For example, the eye should be above the snout, not on the side.
Add Realistic Fur Texture
Drawing fur can be tricky. Many people draw straight lines, but capybara fur is rough and uneven. Use short, quick strokes with your pencil.
- Follow the direction of the fur: On the body, strokes go from back to belly; on the face, they radiate from the nose.
- Vary pressure: Press harder for dark areas, lighter for bright spots.
- Layer your strokes: Build up fur gradually instead of trying to finish in one pass.
If you make a mistake, use a kneaded eraser to lift graphite without erasing completely.

Credit: www.youtube.com
Shade And Create Depth
Shading gives your drawing a three-dimensional look. Study your reference to see where the light hits and where shadows fall.
- Start with light shading: Use the side of your pencil.
- Darken the shadows: Under the belly, behind the legs, and under the chin.
- Blend gently: Use a blending stump or tissue for soft transitions.
- Highlight areas: Use your eraser to lift graphite and create light spots, such as on the nose or above the eyes.
Here’s how different pencils compare for shading:
| Pencil Type | Shade Darkness | Best For |
|---|---|---|
| HB | Light gray | Basic sketch, light fur |
| 2B | Medium dark | General shading, fur texture |
| 4B | Very dark | Deep shadows, eyes, nose |
Check your drawing from a distance. If something looks flat, add more contrast.
Refine And Finish
Now, polish your drawing:
- Clean the edges: Use an eraser to sharpen outlines.
- Deepen shadows: Add another layer where needed for realism.
- Add tiny details: Whiskers, subtle fur lines on the snout, or small highlights in the eye.
- Remove smudges: Use a clean tissue or soft brush.
Here’s a quick comparison of what sets a realistic drawing apart from a basic one:
| Basic Drawing | Realistic Drawing |
|---|---|
| Simple outline | Detailed outline with soft curves |
| Flat shading | Layered shading, clear light source |
| Uniform fur | Varied fur direction and length |
Credit: capybaramag.com
Common Mistakes And How To Avoid Them
- Wrong proportions: Capybaras are not just big guinea pigs. Double-check the body-to-head size.
- Ignoring light source: Pick one direction for light and stick with it.
- Flat fur: Add variation in your pencil strokes.
- Overworking: Too much blending can make your drawing muddy. Stop and look often.
- Stiff lines: Keep your hand relaxed for natural curves.
A good tip is to take breaks and return with fresh eyes. You’ll spot mistakes you missed before.
Practice And Progress
No one draws perfectly the first time. Practice with different reference photos, try capybaras in various poses, and experiment with pencil types. Track your progress by dating your drawings. Over time, your confidence and skill will grow.
If you want to learn more about capybaras, their behavior, and anatomy, check out this Wikipedia page for more in-depth information.
Credit: magnolia.jntukcertificate.edu.in
Frequently Asked Questions
How Long Does It Take To Draw A Realistic Capybara?
It usually takes 1 to 2 hours for beginners, depending on detail and practice. More experienced artists can finish in less time.
What Is The Hardest Part Of Drawing A Capybara?
Most people struggle with fur texture and getting the proportions correct. Spend extra time observing your reference.
Can I Use Colored Pencils For Realism?
Yes, colored pencils can create lifelike effects. Start with the same steps, then layer colors for fur and shading.
Should I Trace A Photo To Learn?
Tracing is helpful for understanding proportions, but try sketching freehand as soon as possible for better skill development.
What If My Drawing Looks Flat?
Increase contrast in your shading and study how light affects the capybara’s body. Focus on highlights and shadows for more depth.
Drawing a capybara realistically is a rewarding project. With patience, careful observation, and practice, you’ll see progress in every drawing you do. Enjoy the process and celebrate each improvement along the way!


